Engineering Mobile Apps: Our Expert Playbook
Jackrabbit’s approach to software engineering
Jackrabbit builds and releases native iOS and Android apps. Each mobile app is frequently updated with new features. We plan each feature by splitting it up into functionality statements called user stories. Each project team implements a handful of user stories each week. We define the required changes and acceptance criteria for the changes at the beginning of the week and we demo the completed changes to all stakeholders at the end of the week. This process follows the principles of agile development.
Each team member is placed on the project team they feel most fit and interested in working on. This leads to highly productive teams that exceed stakeholder’s expectations most weeks. Sometimes we do run into problems that prevent features from being ready by the expected deadline. When this happens we can reprioritize remaining features, add developers or slightly push a release date. In any case we don’t rush if a feature takes longer than expected because cutting corners will lead to subpar results.
The following chapters outline the best approach we know to developing mobile-first applications for our set of clients ranging from funded startups to larger enterprise and the variety of projects we’ve delivered, from healthcare to dating apps.
Architecture Patterns
Client side architecture
Our client-side architecture, regardless of platform, always follows object oriented programming principles and the Model-View-Controller, or MVC, software architecture pattern. This pattern divides the code up cleanly between the model (which holds the app’s data and business logic), the view (the user interface to show and modify the data), and the controller (an intermediary between the model and the view). This separation of responsibilities helps our developers focus on one aspect of the app at a time, as well as allowing multiple developers to work on different pieces of the code in parallel.

We take the MVC pattern one step further with MVVM, or Model-View-ViewModel. In practice we find that, in MVC applications, the controller can grow to be very large and begin to have too much responsibility as it is so closely connected to the view it is controlling. MVVM formalizes this connection by combining the view and controller into the View, while the ViewModel now takes responsibility of the view presentation logic and interaction with the Model data out of the controller. This helps to make our apps have lighter and more testable views and controllers than what we tend to experience with traditional MVC.
Backend services
When we build a client-side app that requires interaction with backend services, such as a database or file storage, we strongly believe in using RESTful principles to guide the app’s interaction with a backend API. REST leverages existing HTTP functionality and helps separate the API endpoints into logical resources for easy consumption by client apps.
These resources should be divided into the correct GET, POST, PUT, PATCH, and DELETE actions. The resource names are plural nouns and the services should return sensible HTTP status codes. Other practices should also be followed, such as: putting the API version in the URL, filtering and sorting actions passed as parameters, and cursor-based pagination.

Likewise, we strongly prefer working with backends that serve JSON-only responses as opposed to the more verbose, difficult to parse, and less compatible XML. Whether we are building the backend ourselves or integrating with a client’s, RESTful practices, JSON responses, and a well-documented API help us to easily integrate and interact with backend services.
Lastly, we are proponents of SSL Everywhere and believe all traffic coming to and from our apps should be securely encrypted, so we also demand these expectations for our backend. Apple is pushing its mobile developers to embrace SSL/TLS (and encryption in general) with their App Transport Security introduced in iOS 9, and is likely to require it in a future version of iOS. When dealing with authentication, it should be established through an /Auth endpoint and maintained through an auth-token header field.
Code re-use
Throughout the course of working on many projects, we have found that many apps we build use similar architectures and coding patterns to get them up and running; especially related to commonly used pieces like networking, databases, view management, and more. When we notice a particular theme where we are writing the same code over and over for different projects, we will usually try to generalize it and turn it into a shared library that can be used on any of the apps we build going forward. For example, see our JRMSimpleGeofenceManager library
This helps us to more quickly get new projects up and running as well as prevent a lot of duplicate work on basic features we’ve already built before. Features only built once for one app are generally not something we will do this with, as they are usually specific to solving the problems for that app.
Documentation
Project documentation
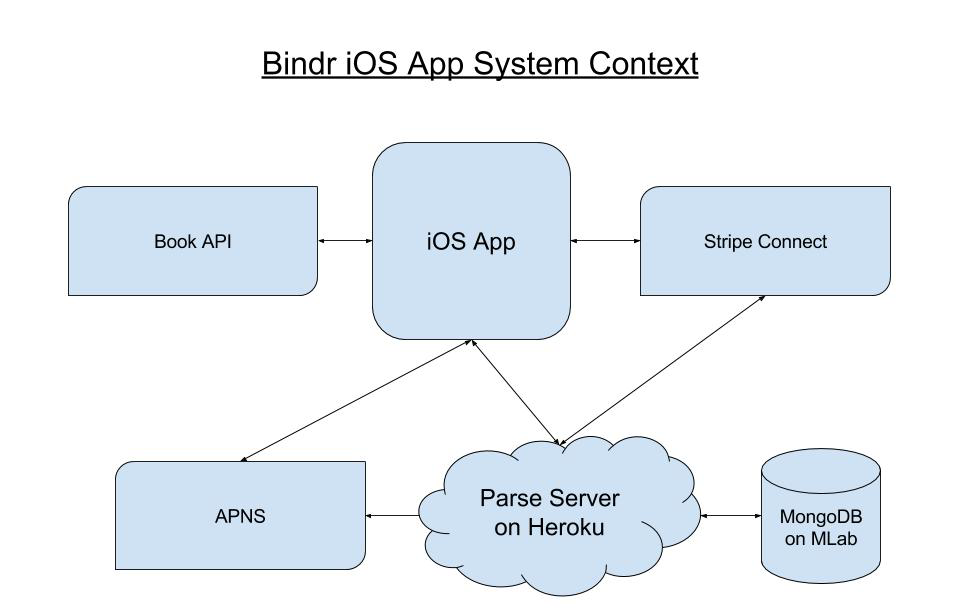
The bulk of project documentation is created during the Project Discovery and Strategy phases. Project documentation answers all the common questions that are required for planning and implementing a mobile app. Project documentation includes an initial list of use cases and user stories, a system diagram and a data model. It is also often useful to define the REST contractin the project documentation so that the backend team knows how their code will interface with the front end.
Code base documentation
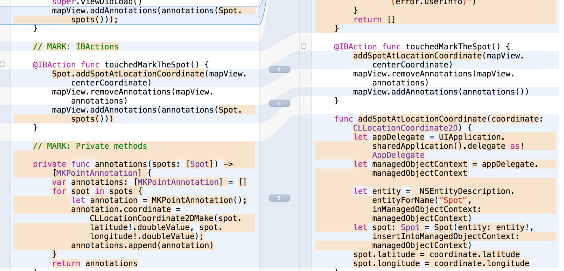
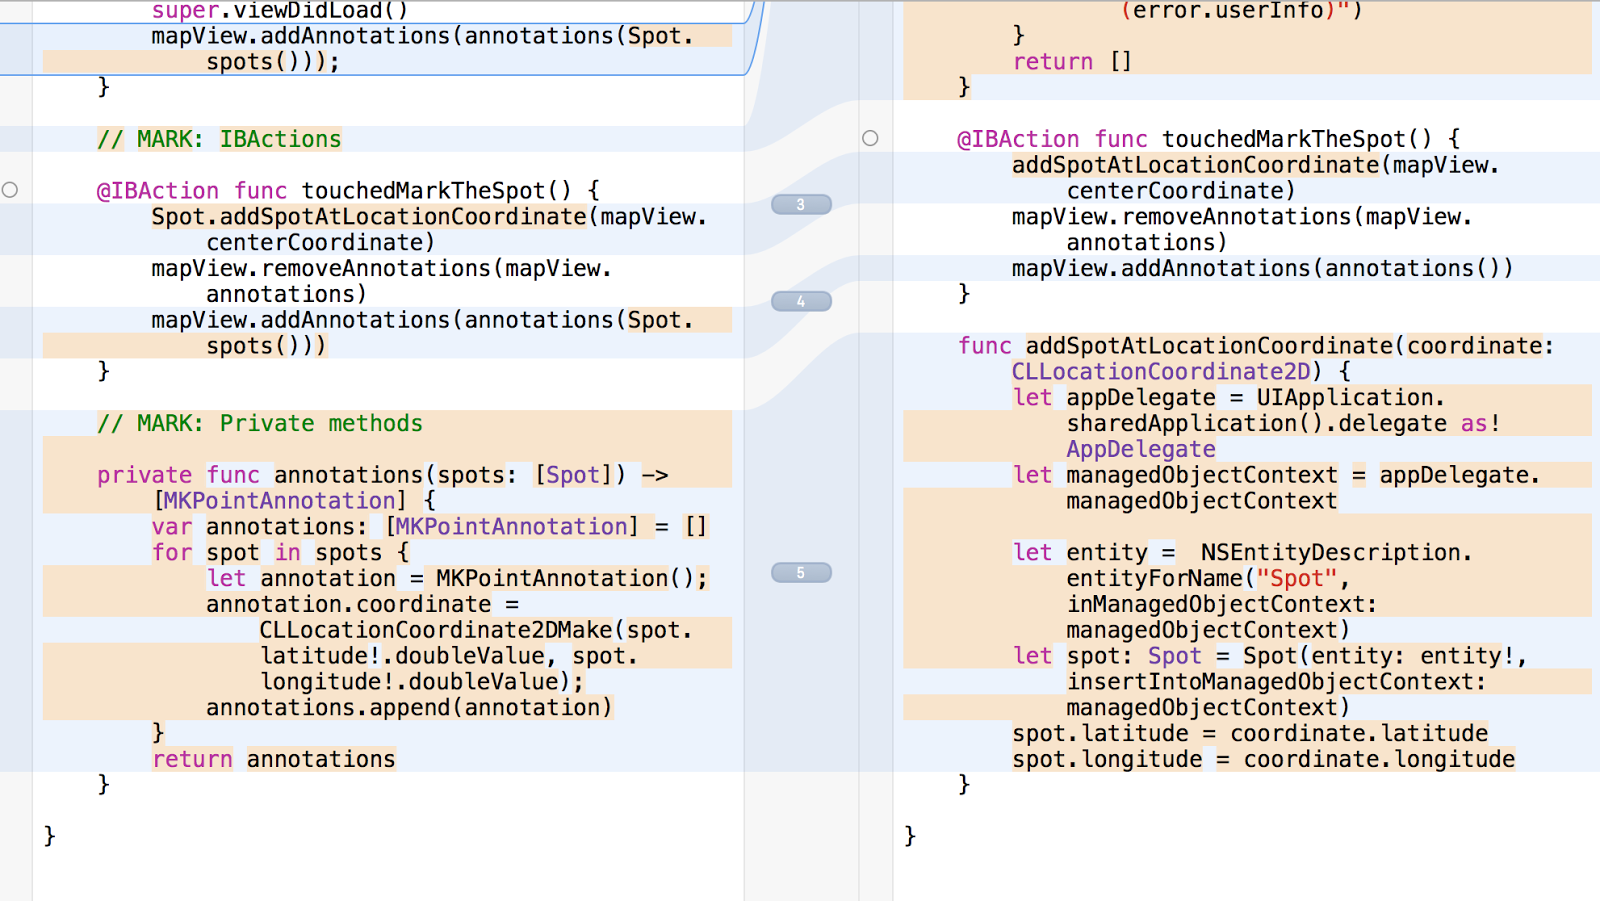
Code base documentation is a combination of reference documentation auto-generated from javadoc formatted comments in the source code and a summary of the app architecture. The tools we use to auto-generate reference documentation are explained in Chapter 4: Developer Tools. The app architecture is the tech lead’s blueprint for how all the different app components fit together to create a piece of software that fulfils the required use cases. It lists all the major components of the app and explains how the components are implemented. As such it’s a very useful thing to have when the project is moved to a new team or when a new member joins the project team.
The app architecture lists all major objects such as the network manager, push manager or routing manager. It lists deep links the app can handle (iOS) and intents it can handle (Android). It lists the models used by the app, including the names of model classes and the business logic responsibilities of each model. It explains how information is shared among the app’s objects (e.g. with parcelables for Android and through managed object contexts for iOS). It lists any architecture patterns being used such as MVC or MVP for Android and MVVM for iOS. It summarizes how the layouts are organized and how they are instantiated including fragments on Android and custom UIView subclasses on iOS.
The app architecture also lists all the app’s library dependencies and 3rd-party SDKs used. It explains any complex implementations that don’t follow standard patterns. On iOS it lists additional project specific configurations such as those in the Info.plist, whether it is using CocoaPods, and if it is using class extensions or precompile headers. On Android it lists additional project specific configurations such as those in the app manifest or build scripts.
Developer Tools
Development Tools
Each app we build has a single codebase. We edit this codebase in the current release of Xcode for iOS and in the Dev Channel release of Android Studio for Android. Each codebase supports the latest versions of each operating system as well as some of the previous versions. We aim to support the operating system in use on 90+% of devices. As of early 2016 this level of operating system support requires supporting iOS 8.1 and later and Android API 16 and later. We write our Android code in Java and our iOS code in Objective-C or Swift.
Libraries and Frameworks
We make extensive use of well documented and maintained libraries and frameworks because they reduce development time by reusing code that’s already been written, while simultaneously reducing the number of potential defects that may appear because they’ve usually already been addressed by the library maintainers. Libraries and frameworks also decouple modules of functionality so that our code can focus on the app’s business logic without reimplementing common features that already exist.
Android and iOS both have very active open source communities. We use libraries shared by people in these communities and contribute back to the libraries any improvements we make. For example, some of our most used iOS libraries are AFNetworking which simplifies creating web service requests and parsing their responses, TLIndexPathTools which simplifies managing a presentation data model for tables and collection views, and SVProgressHUDwhich is used for showing customizable modal alerts which dismiss themselves. On Android our most used libraries are Picasso for downloading and caching images, Retrofit for networking, and Dagger for dependency injection.
We’ve also got some private libraries that we commonly use. We have JRMPushManager which can acquire and upload device tokens and show in-app alerts for received push notifications. We have JRMRestBase for querying RESTful APIs and parsing JSON responses into managed objects, and we have JRMAuthManager for maintaining client side user sessions with a username stored to the system defaults and a password stored in the Keychain.
We also commonly integrate with 3rd party services using their native SDK frameworks. These 3rd party services do the heavy lifting required for things like payment processing and crash reporting. We use Crashlytics to upload crash reports from end user’s devices so that we can see the affected device types, OS versions and even the line numbers where crashes occur. We use Stripe Checkout for accepting credit card payments without having to worry about maintaining a merchant account or PCI compliance rules. We use Parsefor channeling user and app data from native iOS and Android clients to a shared database server. Almost every project gets its own set of additional 3rd party integration such as Salesforce integration for CRM data and AdMobintegration for advertising.
Each library or framework must be configured to correctly integrate with our projects and reintegrated whenever the library or framework maintainers release a new version. We use dependency managers to automate these integrations and reintegrations. We use CocoaPods for iOS projects and Gradle for Android projects. Both tools make it quick and simple to pull in open source or private code repositories straight into Xcode or Android Studio while keeping the dependency files isolated from the project specific files. Dependency files are pulled into a Pods subdirectory when using CocoaPods and cached in the ~/.gradle directory when using Gradle. We don’t want dependency code in our git repository so we add the Pods directory to each project’s .gitignore when using CocoaPods for dependency management.
Open Source Licenses
It’s always important to understand the licenses under which you can use each of your dependencies. We prefer using libraries that are available under permissive licenses that don’t require our derivate work to be open source or non-commercial. For iOS this is usually the MIT license and for Android it’s the Apache License v2.0.
Frequently used tools
There aren’t many tools necessary for native app development aside from Xcode and Android Studio. However we do use a handful of tools for debugging and finding ways to tune the performance of our apps. We use the iOS simulator and the Android Genymotion emulator to run builds of our app as we are developing. We use Quicktime and Vysor to mirror real devices to our Macs so that they can be recorded and shared. We use Charles Proxy to record the network activity of our apps. On iOS we use Chisel for advanced UI debugging beyond what’s built into LLDB. We use a command line tool called HTTPie to run HTTP requests and understand server responses and we use the canned-response-server node module to stub out arbitrary JSON responses to any server request to quickly test how our apps behave when the server returns a different set of responses for a given set of requests. We also use Leaky Canary and Xcode Instruments to diagnose memory leaks and performance bottlenecks in our code.
Project Organization Guidelines
Coding style patterns are the rules of formatting and code organization we expect of all code that is checked into version control. We use a single set of coding style patterns for writing native mobile apps in Objective-C, Swift and Java. This sounds like it wouldn’t be possible but it is because we allow the style patterns to defer to the language’s’ own patterns where necessary and we allow for consistency of style patterns within a project to override the “correctness” of the style patterns used.
Our coding style patterns
We use the IDE’s default indentation style for indenting nested levels of code. In Xcode this is a single tab for each level of indentation and in Android Studio it’s four spaces. We place the opening brace for methods on the same line as the method declaration and the closing brace on a line all by itself. In Objective-C, we include a single space at the beginning of method declaration between the — or + and the return type. This rule doesn’t apply to Java or Swift because these don’t use a — or + in method declarations. We list public methods before private methods, implementation methods before class methods and group methods involved in the same responsibility, such as presentation or networking, together. On iOS we label grouped methods using #pragma mark notation.
We document any nontrivial methods with a one sentence comment explaining the purpose of the method. These comments are later used to automatically generated documentation for the project. We use the Javadoc format to write these documentation comments on both iOS and Android. The Javadoc format places the one sentence explanation of the method within a set of multi-line comment tags (/* */) and optionally includes a description of the method’s parameters, returns and throws. We don’t use comments in many other places. Our code is written to be readable and self explanatory so we only include inline comments as a last resort when the code can’t be made self explanatory.

We encourage logging any errors that occur at runtime but we don’t recommend committing developmental or debug logging to the project as it needlessly clutters up the console output. Instead, we put debug logging in breakpoints so that it’s easy to enable and disable and is kept in the IDEinstead of in the source code. We write variable, property and method names in CamelCase with only the first letter of each word being capitalized. This even applies to acronyms. We prefer including a LICENSE.md in the project over including a copyright notice in every file because starting every file with a copyright notice wastes screen space and gets in the way of the code. We prefix project specific classes with the project’s initials but use the prefix JRM for classes that are used in multiple projects.
XML layouts and image assets
We keep XML layout files and image assets in our project repositories right next to the source code. On iOS these XML layout files are called Storyboards and they contain a Scene for each screen. Scenes are connected to each other by segues and sometimes embedded in other Scenes. We use Interface Builderto add elements to Scenes and to modify the AutoLayout constraints on elements which determine their size and position. On iOS we only edit the raw XML if there is a merge conflict that Interface Builder can’t solve. XML layouts are a lot simpler on Android because they only represent a single activity or fragment in each file and use syntax which is concise and human readable. Android XML layouts can be edited using a visual “Design view” or a XML “Text view.”
iOS and Android apps are commonly deployed to devices with a wide variety of display pixel densities usually ranging from 160 dpi to 480 dpi. Presenting sharp graphics on the many device displays that exist in this range requires exporting image assets in three different pixel densities. The lower density called Non-Retina on iOS and mdpi on Android is about 160dpi. The middle density called Retina on iOS and xhdpi on Android is about 320dpi and the higher density called Retina HD on iOS and xxhdpi on Android is about 480dpi.
Assets exported at the middle pixel density have dimensions twice as large as the lower density and assets exported at the higher density have dimensions three times as large as the lower density. We use density independent dimensions in code to abstract away the pixel density of the specific device display and let the iOS and Android operating systems use the asset corresponding to the device’s display density. These density independent dimensions are called points on iOS and dp on Android.
These simple few coding style patterns and layout and asset guidelines lead us to create easy to read code, easy to reference documentation, highly adaptive UI layouts and sharp graphics.
Version Control
Version control is a critical piece of developing code here at Jackrabbit. Due to the variability of clients, our version control protocols remain flexible in order to accommodate the level of involvement of our product owners. In general, we use a Gitflow workflow, a branching strategy for Git repositories that is defined by a dev or develop branch that serves as an integration branch for new features. The master branch serves as the current release branch. This allows the team to finalize and fine-tune the current release branch without conflicting with development of features for the next release.
When starting a new feature, a developer will branch off the current dev branch, and name it under the protocols defined at the beginning of the project, often feature/<short description> or JRM /or/ <project initials>-<ticket number> (which correlates with a ticket in our agile roadmap or this weeks’ sprint). After it is completed, the feature will enter the peer review stage. Peer review is done in one of two ways:
- A pull request is created to alert team members that the feature is ready for review. A team member will then review the code, make comments directly on the pull request (in Github or Bitbucket) if needed, and then merge the branch to develop when it is ready.
- The developer will alert the team it is ready for peer review inside the agile tool (Trello or Jira) by unassigning it to themselves and putting it in the peer review column. The reviewer will make comments directly in the Git repository hosting service or in the agile tool. When ready, the reviewer will assign the ticket back to the original developer, after which they will make a pull request where the project owner can review.
If the reviewer recommends changes to the feature they will assign the ticket back to the original developer, which will make the necessary changes and restart the peer review process. In the case where there are multiple developers and features being worked on concurrently, the developer may wish to merge dev into their feature before making a pull request to handle conflicts themselves. After the desired features are merged into dev and thoroughly tested, the branch can then be merged into master and released.
Code review and pair programming
Code Review
Code review is the process of examining written source code with the intention of finding possible mistakes the original author might have overlooked in order to improve the quality of the software. Code review is usually performed on a different developer’s code.
Engineers at Jackrabbit always review our teammates’ code to ensure the changes meet the acceptance criteria and that the code maintains readability and correctness. Code reviews are also the best way to share programming approaches and to learn from each other’s work. Our code reviews consist of the following steps:
- Verify that the implementation meets the documented requirements.
- Run all automated tests to ensure they still pass.
- Review code quality. Verify that code meets our coding style guidelines, check for bugs, check for unnecessary logging, check that complex code has been refactored, check that method headers are documented with parameter and return descriptions.
- Review code architecture. Check that the code exposes as little as possible in public interfaces, reduces the scope of variables and declares methods as class methods if their implementation doesn’t depend on instance state.
Pair programming
Pair programming is an approach to development and debugging that consists of two engineers discussing the functionality of a code base while both parties are looking at the same screen. Pair programing sometimes speeds up the process of code review by allowing real time feedback and discussions between engineers. It can also enable an engineer to solve their own issue just by vocalizing their assumptions and understanding of the issue.
The way we do peer programming at Jackrabbit Mobile is simply pulling in another engineer whenever we face a problem or when we are stuck on a piece of code. When teammates aren’t in the room we use Screenhero which allows us to see and interact with each other’s screen remotely.
Automated and manual testing
Unit and UI Testing on Android Apps
We use separate modules in our code structure on Android to store our unit and UI tests. This allows us to mirror our package structure in the test modules and keep all of our test specific classes separated from the main application code.
We use the 3rd party Robolectric library to help us unit test our code on Android. Robolectric is a unit test framework that allows us to access the Android SDK without running our tests on a phone or emulator. Robolectric handles inflation of views, resource loading, and other necessary actions that are implemented in native C code on Android devices. Tests can also run on Continuous Integration environments on a regular JVM without an emulator.
Google provides the Espresso library to help create automated UI tests on Android. With Espresso we focus on writing concise, reliable Android UI tests that mimic how a user would interact with our apps. We focus on testing state expectations, interactions, and assertions clearly without the distraction of boilerplate content or custom infrastructure. Espresso does require an emulator or device to run its tests.
Unit and UI Testing on iOS Apps
The premise of unit testing is to create environments that exercise different types of behavior in the app. For iOS we use Xcode’s XCTests. A unit of code should represent a minimally testable component of code to ensure that there are no regressions as the project changes. Tests should run quickly, consume no resources, and use mock objects or responses (using OHHTTP). We ensure that all network calls, data controllers, and view models have unit tests and use Xcode’s computation to ensure we reach at least 75% coverage of a class. If it is difficult to reach that goal, we consider rewriting the class to ensure better maintainability. Testing view controllers is avoided. If something in a view controller needs to be tested, the developer should consider refactoring the code. We group our tests by file to represent the view controller that a data controller and view model target. We may also use performance testing to measure execution time for appropriate projects.
UI testing is different from functional and performance tests in that it ensures the look of the app behaves and changes how you expect it to as a user interacts with it. We use Xcode’s built in UI testing API. With Xcode 7, you can write most of the testing code by “recording” your interaction with the app. We can then edit the generated code by inserting XCTAsserts like normal unit testing to verify the app looks how you expect it to. Just like unit testing, tests should be simple, deterministic, and fail or pass consistently. They should be written as if the user is interacting with the app. Presenting and dismissing view controllers is vital to UI testing, however, the speed at which a test runner does so can often result in error messages. You can get around these errors by presenting each view controller in its own window.
Test Coverage
We believe that the majority of our code should be covered by tests. We do not look to hit a certain percentage level of our code to be tested, but want to make sure every area of the codebase is equally represented in our tests.
Manual Acceptance and Regression Testing
At Jackrabbit we believe our code should constantly be manually tested and looked at by human eyes. Each ticket requires a functional test by someone who did not work on the code. Within 24 hours of code review there will always be a functional or manual test before each ticket can be marked as done. That is typically completed by a project manager, product owner, or dedicated QA.
Platforms, distribution and continuous integration
Client-side Platforms
We develop native mobile applications for a large range of platforms including Android for smartphones and tablets, iOS for iPhone, iPod and iPad, tvOS and watchOS for Apple TV and Apple Watch and AngularJS for web apps.
Server and Database solutions
We also develop server side solutions and work with our clients’ existing servers and databases.
For clients who want to develop an app that requires popular standard backend functionality (database, push notifications, authentication etc.) but lack a server solution of their own, we most commonly use Parse Server. Parse Server simplifies many aspects of developing a backend for mobile apps, including the API server, push notifications and event driven business logic. We host our Parser Server instances on Heroku Dynos, and use S3 buckets for file storage and distribution.
Unlike AWS, Heroku is free for the first dyno (512MB RAM, 1GB swap space, 100MB storage space, and comparable computing power to an AWS micro/small EC2 instance). However, dynos are strictly for application purposes — many of the add-ons and third party services used to support databases and background works may require an extra cost. For larger applications AWS is less expensive in the long-run. For smaller applications, Heroku is cheaper and simpler to get up and running.
Distribution and Continuous Integration
We often set up a continuous integration server to automatically run automated UI and unit tests as well as automated checks at the pull request stage. We can also setup additional automations to upload test builds to HockeyApp for testing, handle code signing, take and upload screenshots and submit releases. We use Bitrise to run continuous integration in the cloud and Jenkins to run it in house. We use HockeyApp or Fabric for distribution as these allow us to distribute Android and iOS builds without any approval wait time.