
iOS Bubble Animation
Cheers to a New Year
For this year’s ATX Startup Crawl, we wanted to do something really fun for our users to give them real-time information about popular stops.
Working with our amazing UI professional Patrick Adiaheno, we designed a “Cheers” button inspired by Periscope’s like functionality. I was given the task of coming up with an animation to illustrate when people “cheers” a company.
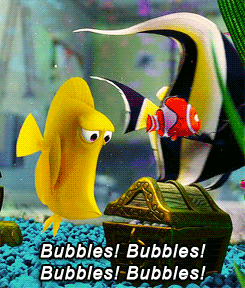
It turned out to be a huge hit. In fact, the first review we got was dedicated solely to the bubbles:

The rest of the Jackrabbit team probably fully regrets the decision to put me in charge, as I have talked about nothing other than bubbles for the last three months and have totally turned into that fish from Finding Nemo.
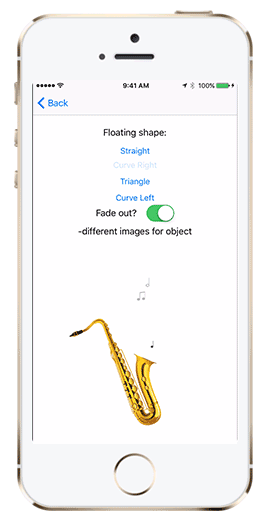
In fact, I was so dedicated to the bubbles cause, I created a small library called JRMFloatingAnimation, which allows you to fully customize “floating” image views to animate whatever your heart desires:
So today I’m here to share a little of the bubble obsession by showing you how it’s done. We’ll be making this little cutie:
1. Create the fish
So let’s start by creating the fish. Create a new Xcode project and in your initial view controller, add the following code:
(I got my fish asset from freepik.com and my bubble image from here.) This will create a fish in the middle of our view controller with a gesture recognizer that will call createBubble when it is tapped. Right now all that method does is add a bubble to the view right above the fish.
 2. Do the math
-
-
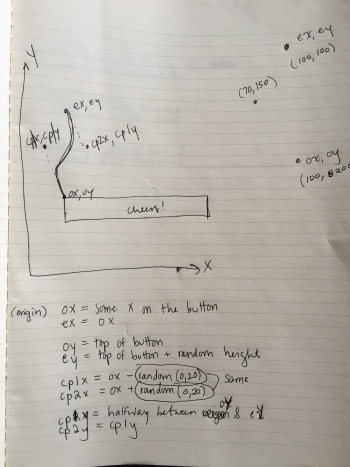
- So let’s make it float, shall we? We could just make our bubbles move north on the Y-axis, but that’s not really how bubbles float, is it? They float in a rounded zigzag motion. So how can we do this? Well first we need to create our zigzag path. For that, we’re going to use UIBezierPath. An UIBezierPath can be used to create a simple shape point-by-point using the moveToPoint and the addLineToPoint methods. You can then use control points to define Bezier curves to your path. (Source) Perfect–it already looks like the shape of the path we need. So now we just need to do some math. Now, I could impress you by writing out some beautiful polynomial equations to derive these control points, but let’s face it–I was on Facebook during my vector and calculus classes and I would just embarrass the both of us by trying. Plus, I’m a programmer and that means I’m going to find the quickest and laziest way to do it, in this case–pen and paper. (If you’re an overachiever and want to do it the fancy way, you can read more about these calculations here). Here are my notes from when I created the bubble animation for the ATXSC “Cheers” button:
 So let’s do this:
 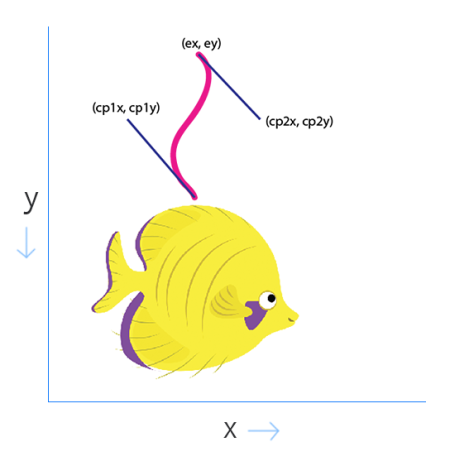 Where:
-
– ox = some x on the fish – oy = top of the fish – ex = ox – ey = oy + how high we want the bubble to go – cp1x = ox – some t – cp1y = halfway between ox and ex – cp2x = ox + t – cp2x = ox + t – cp2y = cp1y Hopefully that makes sense to you. If not, it may help to draw it out yourself.
3. Create the path
Great, so now we can make our path. Add this to your createBubble method:
4. Create the animation
Now we need to get our bubble to animate along that path. For this we’re going to use CAKeyframeAnimation and it’s convenient path property. Add this after your path calculations:
Let’s test it out!  In the words of Penny Hartz,
  Looks awesome! If you tap the fish quickly, you can clearly see the bezier path that our bubbles are following. Next we’ll want to remove the bubble from our view after it has finished animating.
5. Pop the bubble
We also want to give the impression that the bubble is popping, so we’ll slightly increase its size before disappearing. We will need to use CATransactions to specify a completion block for our animation. Add the following code before you declare the pathAnimation:And add [CATransaction commit]; after adding it to the bubbleImageView‘s layer. Build and run to check out the new functionality: 
Fantastic!
6. Add some variation
Next let’s add some randomness to make the bubbles more realistic. First, we’re going to mix up our control points, so that the bubbles will randomly swing left or right (right now they are always swinging left and then right). Now, this was a bit trickier once I started thinking about it, but I decided to generate a random value between 0 and 1 and swap when that value was 1. Probably not the most clever way (I would love to hear what you thought of below!), but it was quick, readable, and to the point:I also decided to move the bubbles original starting point to the tail, as if the fish was creating them by moving its tail. Or farting. You may have to play around with these values to make it just right for the fish image you chose.
Alright it’s starting to look a bit more realistic now! We’re going to do a few more things to randomize the action now. First, let’s add this helper function I pulled off of Stack Overflow to make our lives easier:
And now we want to:
And remember, you can fiddle with the “small number” and “big number” to get it just right for you–these are just the values that worked for me! 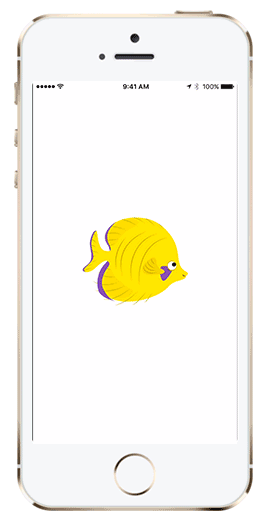 Here’s how mine is looking now. Man, that fish must have eaten some serious beans. At this point, you can now successfully call yourself an iOS Bubble Maker Machine.
7. Animate the fish
If you want to make your fish move like the above demo, add the following method:This will move your fish across the screen from left to right, and then start over. The only change you will need to make in your createBubbles method is to instead use the fishImageView‘s presentation layer to get the current location of the tail while the fish is in motion.Lastly, remove the gesture recognizer, set a timer, and let that fish fly. Swim. Let that fish swim.
 You did it! Way to kick some bubble butt.
You can find the example project on Github. I would love to see everyone’s creations! And be sure to check out JRMFloatingAnimation if you want to do more.